* * *
Sunday, November 27, 2011
How to change Word 2010 Ruler display Inches to Centimeters
Click the File TAB, Options, Advance,
scroll down to the Display section, choose the measurement unit in the
field ‘Show measurements in units of:’ and click the OK button at the
bottom of the window.
How to display Word 2010 ruler
To
turn Word’s ruler ON/OFF click the ruler icon located at the upper right side
of the screen below the Ribbon.
Each click on the ruler icon will toggle the ruler ON/OFF.
Each click on the ruler icon will toggle the ruler ON/OFF.
Tuesday, November 22, 2011
How to turn on Windows Games
Windows 7
comes with built in set of games placed by Windows in the games folder.
To open the games folder:
To turn on the games do the following:
When all games are enabled, the games folder should look like this:
To open the games folder:
- In the search field type games. Search result list will pop up.
- Click Games Explorer, usually at the top of the list
and the games folder will open.
If the
folder doesn’t look like the above screenshot of the games folder, probably the gameson the computer
were turned off.
To turn on the games do the following:
- Click
Start
- Control Panel
- Programs and Features
- Click
the link,
 Turn Windows features on or off, at
upper left side
You may be
asked to enter administrator password.A window
with list of programs will open.
- Click
the checkbox near the Games to select it
- Click
OK.
* * *
Save Excel 2010 file in Excel 2003 format
When the default preference is to save all Excel 2010 workbook
in file format of Excel 2003, change the ‘Save files in this format:’ on the
Save sheet options, to Excel 97-2003.
File extension of Excel 2003 is *.xls
File extension of Excel 2010 is *.xslx
Click File TAB, Options, Save, Select the preferred format in the ‘Save files in this format:’ field.
File extension of Excel 2003 is *.xls
File extension of Excel 2010 is *.xslx
Click File TAB, Options, Save, Select the preferred format in the ‘Save files in this format:’ field.
Save Word 2010 document in Word 2003 format
When the default preference is to save all Word 2010 documents
in file format of Word 2003, change the ‘Save files in this format:’ on the
Save sheet options, to Word 97-2003.
File extension of Word 2003 is *.doc
File extension of Word 2010 is *.docx
Click File TAB, Options, Save, Select the preferred format in the ‘Save files in this format:’ field.
File extension of Word 2003 is *.doc
File extension of Word 2010 is *.docx
Click File TAB, Options, Save, Select the preferred format in the ‘Save files in this format:’ field.
Monday, November 21, 2011
Word 2010 Normal template setup
New Word document will open with the
setup of the Normal template. Change the Normal template to your personal
preferences setup such as font type, font size, view ruler, etc. then after
every new document will be opened with your personal setup.
To open and edit the Normal template, find the template file, right click on the file and click Edit (in Word 2010) or Open (in Word 2003). Make sure that the template file was opened and not a new document, by reading the file extension at the top bar.
In Word 2010 the file name of the Normal template is Normal.dotx
In Word 2003 the file name of the Normal template is Normal.dot
In Windows 7 the Normal template is located at:
C:\Users\user_name\AppData\Roaming\Microsoft\Templates
In Windows XP the Normal template is located at:
C:\Documents and Settings\user_name\Application Data\Microsoft\Templates
Sunday, November 20, 2011
How to hide #N/A result, in Excel 2010
In Power Point presentations where there is a need to hide #N/A results for aesthetics purposes in Excel tables that were inserted in the presentation. There are two options to hide #N/A results. (A) By using IFERROR function, (B) By using the enhanced Conditional
Formatting of Excel 2010.
Read section (C) below on how to hide #N/A result in Excel's print out by using Page Setup.
A) Using IFERROR function
Let’s say that sometimes one of the cells in column E can display #N/A.
B) Using the Conditional Formatting
Read section (C) below on how to hide #N/A result in Excel's print out by using Page Setup.
A) Using IFERROR function
Let’s say that sometimes one of the cells in column E can display #N/A.
In the above example cell E6 contains the
function VLOOKUP(F6,$G$6:$H$10,2,FALSE) and displays the #N/A error.
The following IFERROR function, will replace #N/A with blanks:
=IFERROR(VLOOKUP(F6,$G$6:$H$10,2,FALSE),"")
B) Using the Conditional Formatting
We will format all cells in column C in such a way that each
time when the cell value is #N/A, Excel will hide the text.
- Click the Conditional Formatting in the ribbon of the Home TAB.

Pull down menu will open.
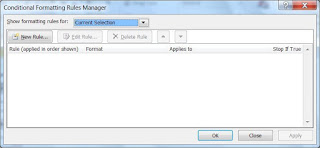
- Click Manage Rules...
This window will open

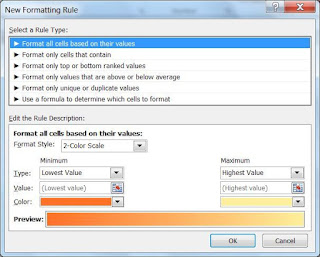
- In the above window, click the New Rule… button
This window will open

- Click the second line
„Format only cells that contain
This window will open
- Click the down arrow at 'Cell Value' and select the line 'Errors'
The window will look like this:
- Click the Format… button
- Click the down arrow of the 'Automatic' field
The next window will open
Colors pallet will open.
Select No-Color (or white color) for text and click the OK button.
Select No-Color (or white color) for text and click the OK button.
The next window will show up.
- Click the cursor in the beginning of the field Applies to
Press the keyboard Del key
to delete all the text in the Applies to field.
With the mouse, mark the area in which the #N/A error will be hidden, let's say cells C3
through C10 in the above example and press the keyboard's Enter key.
If this step was done correctly the
text in the Applies to field will show
=$C$3:$C$10
Click the OK button to
complete the process.
Now cells with #N/A, like C4 and C8, will look
empty.
C) Hide #N/A result in Excel's print out
1. Open the Page Setup, in the Page Layout TAB
Subscribe to:
Comments (Atom)


